| The first step when a set of injectors arrives in the shop is each injector is removed from the box and is inspected for physical damage and/or missing parts.
|
|
| Next, each injector is engraved with a serial number. This permanent number allows each injector to be tracked through the servicing process and the data collected for each injector can be referred to weeks, months, or even years later.
|
|
| The next step for injectors with metal bodies is a thorough
external cleaning by bead blasting the body with plastic blasting media.
This removes all rust, dirt and corrosion from the external surfaces
without damaging the injector. This allows for a closer inspection of the
overall condition of the injector and also allows the flow test fluid and
ultra-sonic cleaning solution to remain free from contamination.
Injectors with plastic bodies are not bead blasted but are cleaned in a heated ultra-sonic bath to remove dirt and contamination from the external surfaces.
|
|
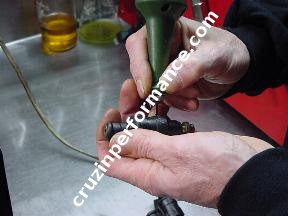
| Next, the inlet screen is removed from each injector and the inlet of the injector is inspected for rust or corrosion.
|
|
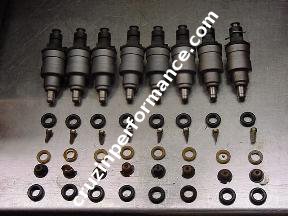
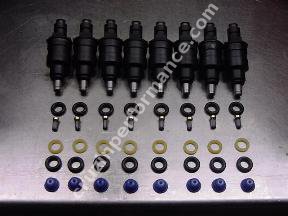
| The last step in disassembly involves removing the remaining o-rings, pintle caps and spacers. The injectors are now ready for servicing.
|
|
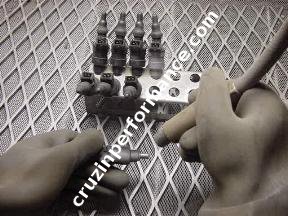
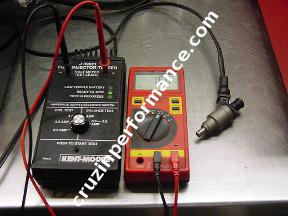
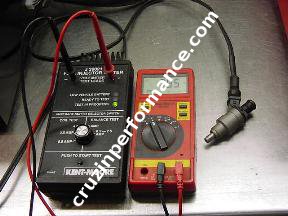
| The first electrical test is to check each injector's ohm resistance. This tests the injector's coil windings for shorts or opens in the windings. The readings are noted on the injector service data sheet.
|
|
| The second electrical test is a coil load test. This test checks the condition of the coil windings while in a "powered up" condition. The readings are noted and each injector is compared to the others for differences between the set of injectors.
|
|
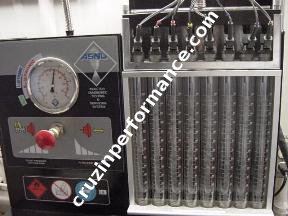
| I have both NEW AGE and ASNU flow bench machines and utilize either or both depending upon the type of injectors being serviced. Working closely with the manufacturers allows me to utilize the latest in testing equipment. |
 |
|
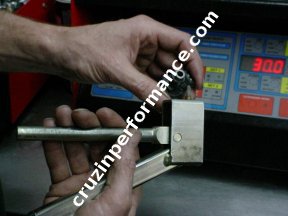
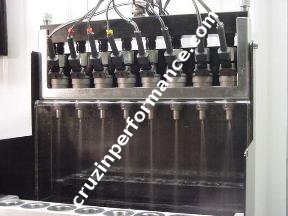
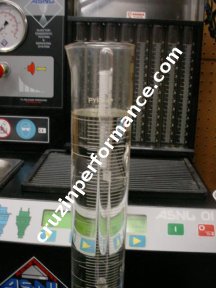
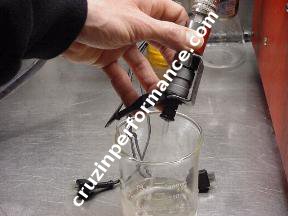
The injectors are next mounted onto the flow test bench and are pressure tested up to 80psi depending upon the conditions the injectors will be operating under when installed in the vehicle. Any injector(s) that leak or drip during this test are noted and will be checked again for leakage after the cleaning process has been completed.
|
|
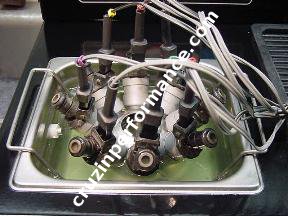
| The next test is a visual test of the injectors while being flowed under pressure. The injector spray patterns are checked for uniformity. Any injector that has a �stringy� or abnormal pattern is noted.
|
|
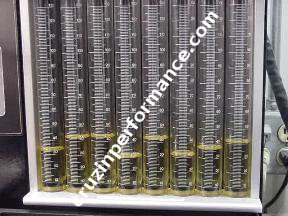
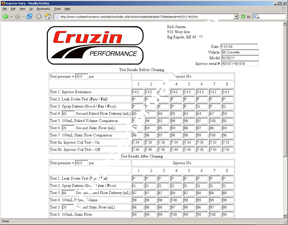
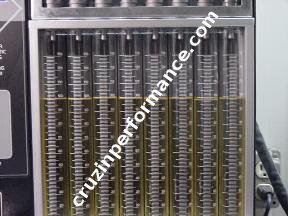
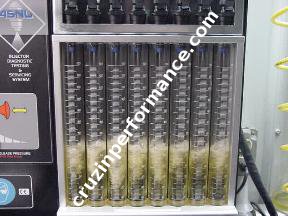
| Next, multiple flow volume tests are performed. First, all of the injectors are flow tested in both a static (wide open) and a dynamic (pulsed) mode. These are �timed� tests and range from 15 to 120 seconds. The results are noted for comparison after the cleaning process. As you can see from this illustration, the injectors can have a wide range of flow volume. This shows that these injectors are in need of cleaning and the engine they came from would not have been running as smoothly or efficiently as it would have if all of the injectors were flowing the same volume.
|
|
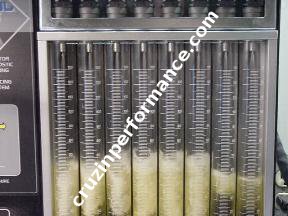
| Now the injectors are flow tested again both statically and dynamically until one or more of the injectors reaches 100ml in flow.
|
|
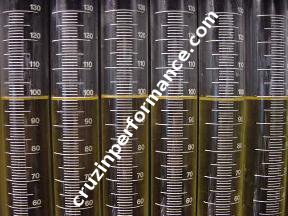
| Once again, the flow difference of the injectors is evident. By testing the injectors to 100ml, a percentage difference of flow between the injectors can be easily calculated.
|
|
| You can see in this illustration that while some of the injectors flowed 100ml, others flowed only 83ml. This represents a 17% flow difference between the injectors prior to cleaning them.
|

|
| All of the information collected during testing is recorded and stored in a database, and, after the injectors have been serviced, a link is e-mailed to the customer so that the data can be accessed and viewed. Customers can then print off a copy of the data, even before they have received the serviced injectors.
|
|
| The certified fluid used for testing is specifically manufactured for testing injectors. |
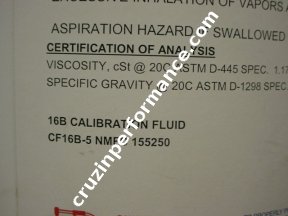 |
| The specific gravity of the testing fluid is checked daily and recorded for each injector set. |
 |
| The injectors are now removed from the flow bench and are installed into the ultra-sonic cleaning tank which contains a special cleaning solution formulated specifically for electronic fuel injectors. Here the injectors are pulsed at varying pulse widths while being subjected to ultra-sonic waves that break up and dissolve debris that has collected on the outside and inside of the injector outlet. This process is performed for a minimum of 30 minutes depending upon the condition of the injectors.
|
|
|
After the ultra-sonic cleaning process is finished, each injector is backflushed to remove the cleaning solution along with any debris that remains inside the injector.
|
|
|
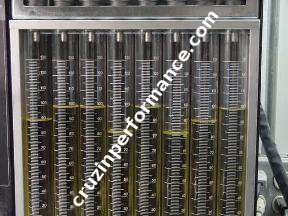
The injectors are then flow tested again in both static and dynamic modes. This data is recorded and compared to the initial flow data from before the injectors were cleaned.
|
|
|
As you can see in this illustration, the difference in flow between the injectors has been decreased substantially. The injectors are now flowing much closer to each other in volume than before cleaning. Ideally, all of the injectors should flow exactly the same amount; however, due to manufacturing tolerances and normal wear this is not always the case. A small variation in flow will not be noticeable in a stock street driven vehicle but for high performance vehicles, the injectors should be within 1-3% of each other.
|
|
|
Once the flow tests have been performed, the injector housings are treated with two coats of a high temperature paint to prevent them from corroding or rusting.
Injectors with plastic housings skip this step.
Injectors with stainless housings are polished to a high luster.
|
|
|
The injectors are now ready to reassemble with new o-rings, inlet screens and pintle caps (if applicable).
|
|
|
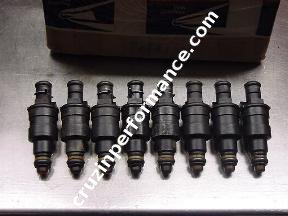
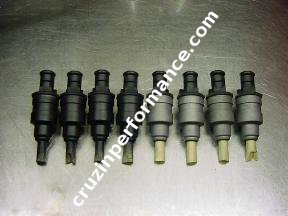
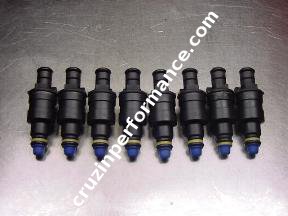
Here are the cleaned and assembled injectors ready for the final phase of servicing.
|
|
|
The assembled injectors are now given a final flow test. The injectors are then flushed with a paraffin-based oil to protect the internal parts during shipping.
|
|
|
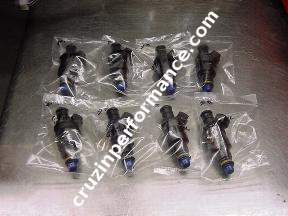
The final step is individually heat seal bagging the injectors and boxing them for return shipping to you the customer.
|
|
I hope this information page has given you a little more insight into the processes that take place during the servicing of your injectors. Thanks for checking it out. As always, if you have questions or need more info, please feel free to ask.
If you see these images and/or text anywhere else on the web, they have been used without permission. If you do see these images and/or text elsewhere, please notify me at the address below.